
Gold Sluice
Gold Sluice Plans
How to build a gold sluice using basic hand tools and/or lightweight power tools.
A quick, easy project that costs next to nothing to build and increases the recovery rate
of gold. Length is a matter of preference. A longer sluice recovers more gold but a shorter
one is more portable. On larger sluices, the side rails should be made taller to handle more
water flow and more material. Each riffle is comprised of several saw kerfs placed closely
together. The total number of riffles is left up to the maker. The last riffle is the largest and
serves as a nugget trap. Predrill all nail holes to prevent wood from splitting. Use of screws
would allow disassembly for ease of transport and storage. After assembly, use caulk to seal
any gaps. Ribbed matting is simply attached at the leading edge.
Carrying handle (1x2 cut to length) can be placed anywhere between or on top of the side
rails. Add paint to waterproof (pieces should be painted before assembly) or use as-is.
Wear eye protection when using any tools. Have fun and find gold!
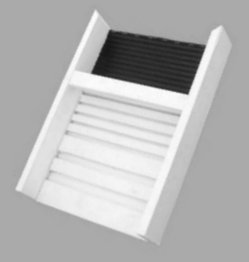
Completed sluice.
Total length is about 18 inches.
A sluice this size is easy to carry to remote areas and over
difficult terrain. The gold bearing
material should be pre-screened and fed at a low rate. That
way the gold has a better chance
to settle out in the relatively short distance it travels through
this sluice. The sluice needs to
be adjusted at a slight downward angle to allow the water flow to
separate the materials.
The lightweight blond sand should be washing away while the heavier
black sand
and gold
are trapped in the riffles. If the riffles fill up quickly with
lightweight
material, the angle or
the flow of water needs to be increased. A large rock positioned on top
of the sluice will keep
it from being swept downstream.
How to
Make a Gold Sluice
Domain Names for
Sale
Earnhardt
Collectibles
Gold
Dredge For One
Gold
Nugget Scope
Base
Metal Prices
Large
Gold Sluice
Metal
Detectors
Health&Wealth
Game Page
Gator Gear
Mini
Sluice
Home
© Berms.com